Provisioning
Pigsty runs on nodes, which are Bare Metals or Virtual Machines. You can prepare them manually, or using terraform & vagrant for provisioning.
Sandbox
Pigsty has a sandbox, which is a 4-node deployment with fixed IP addresses and other identifiers.
Check demo.yml for details.
The sandbox consists of 4 nodes with fixed IP addresses: 10.10.10.10, 10.10.10.11, 10.10.10.12, 10.10.10.13.
There’s a primary singleton PostgreSQL cluster: pg-meta on the meta node, which can be used alone if you don’t care about PostgreSQL high availability.
meta 10.10.10.10 pg-meta pg-meta-1
There are 3 additional nodes in the sandbox, form a 3-instance PostgreSQL HA cluster pg-test.
node-1 10.10.10.11 pg-test.pg-test-1node-2 10.10.10.12 pg-test.pg-test-2node-3 10.10.10.13 pg-test.pg-test-3
Two optional L2 VIP are bind on primary instances of cluster pg-meta and pg-test:
10.10.10.2 pg-meta10.10.10.3 pg-test
There’s also a 1-instance etcd cluster, and 1-instance minio cluster on the meta node, too.
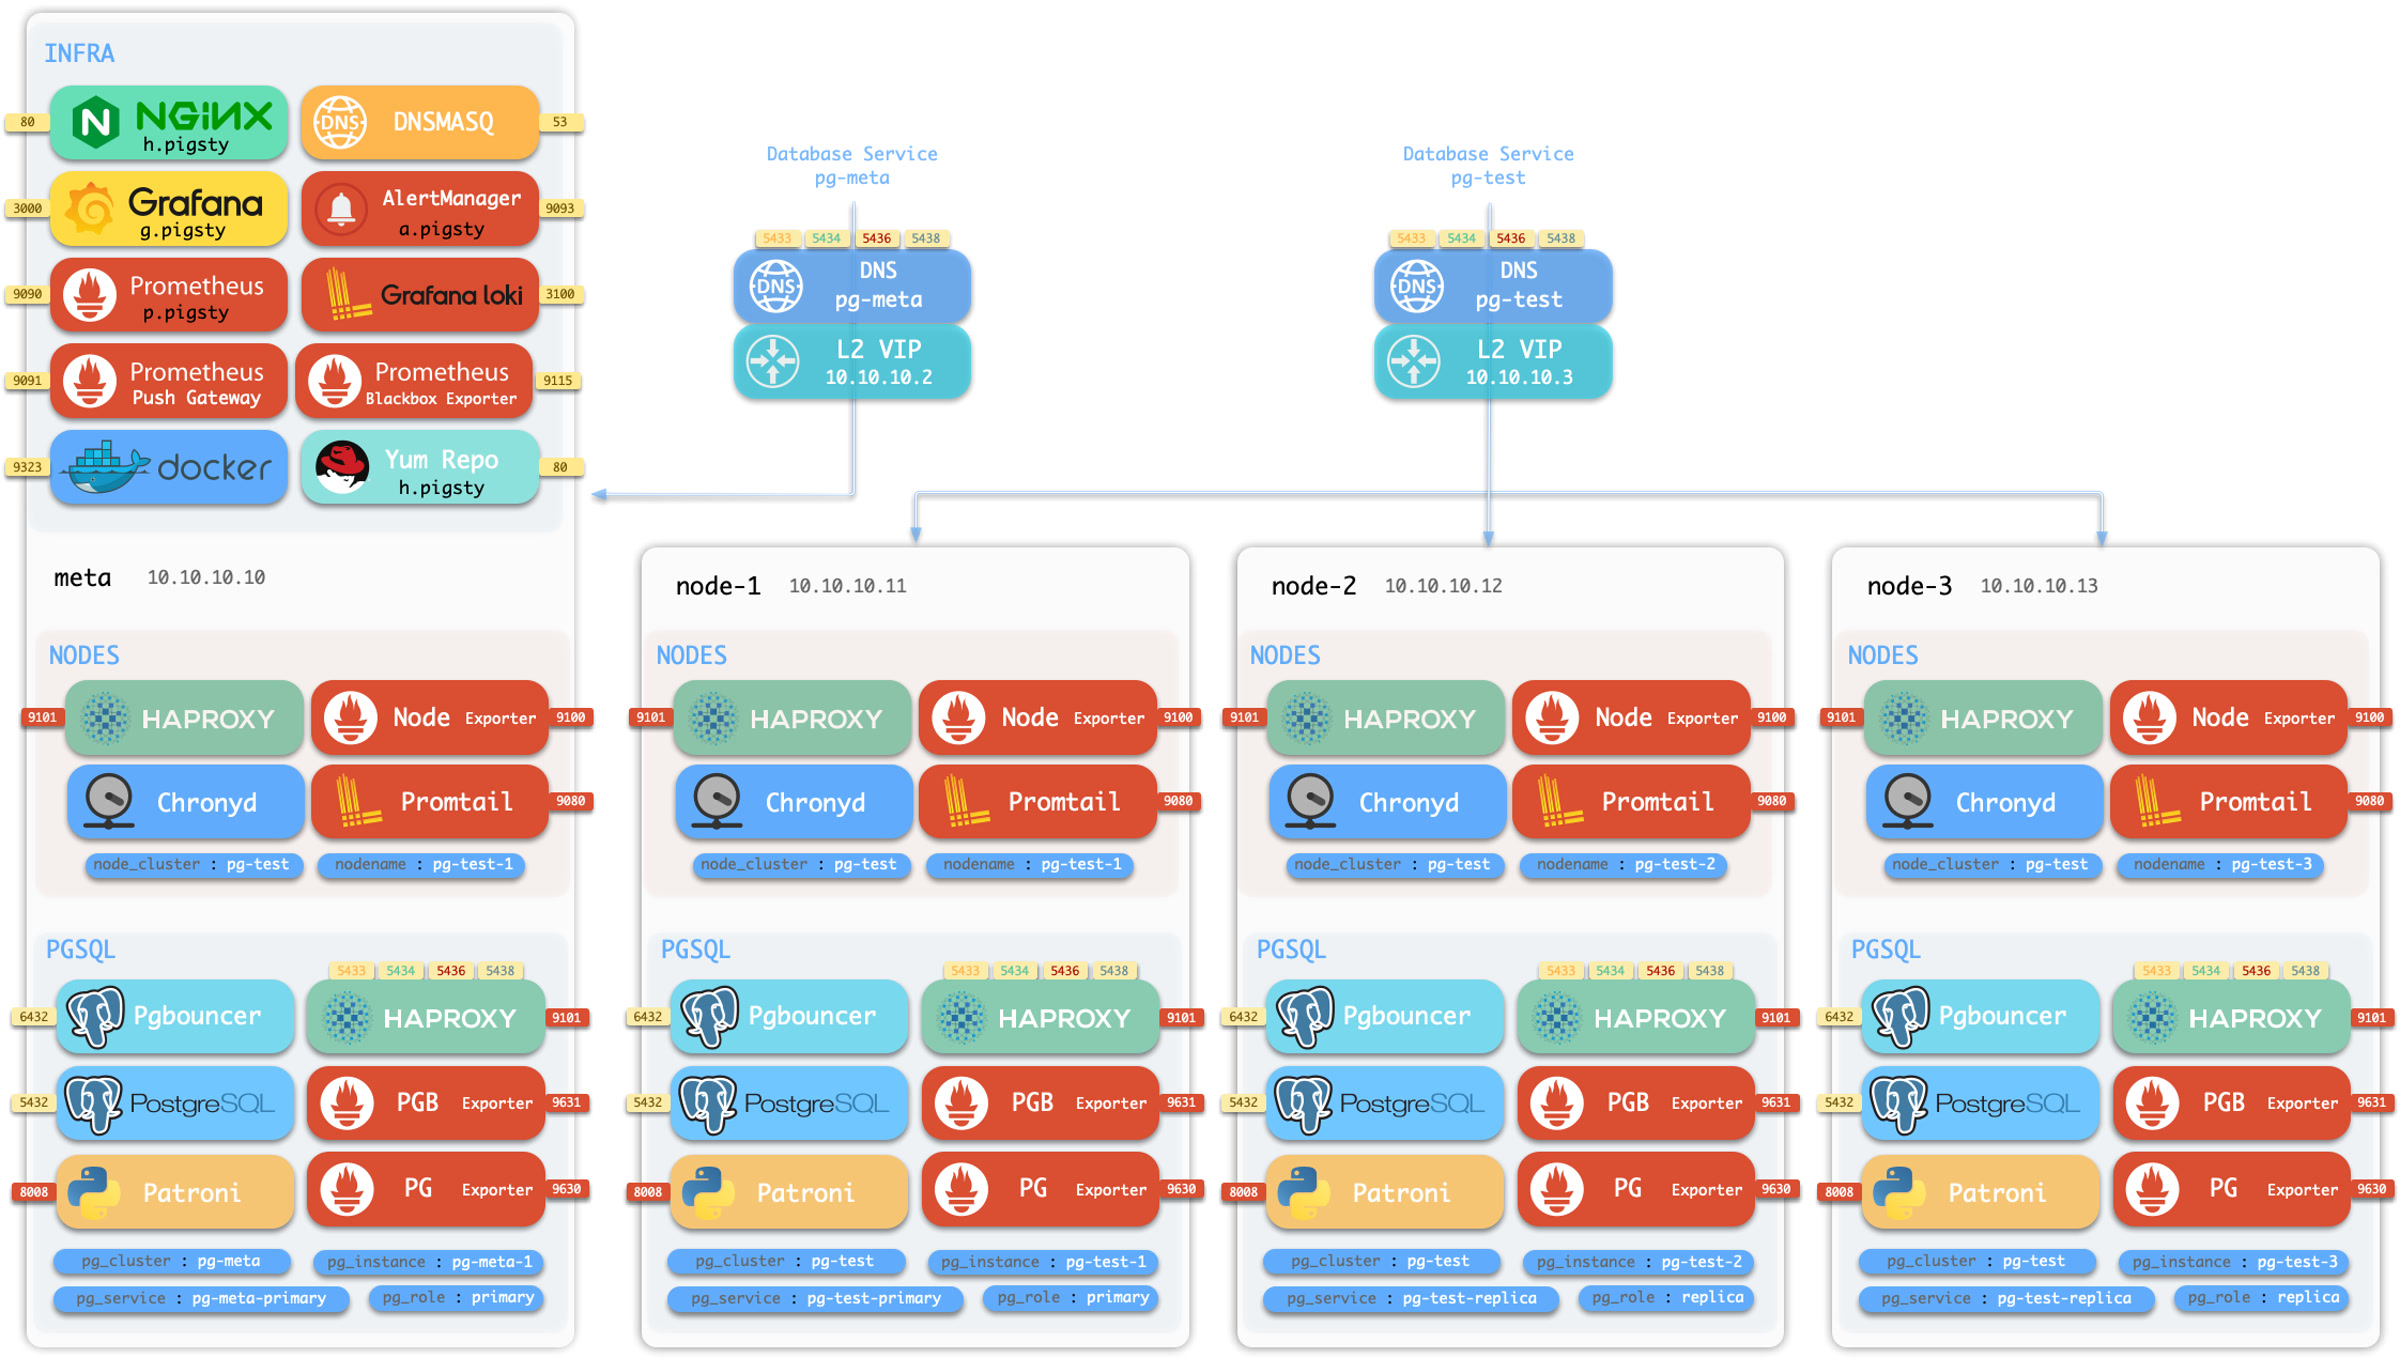
You can run sandbox on local VMs or cloud VMs. Pigsty offers a local sandbox based on Vagrant (pulling up local VMs using Virtualbox or libvirt), and a cloud sandbox based on Terraform (creating VMs using the cloud vendor API).
-
Local sandbox can be run on your Mac/PC for free. Your Mac/PC should have at least 4C/8G to run the full 4-node sandbox.
-
Cloud sandbox can be easily created and shared. You will have to create a cloud account for that. VMs are created on-demand and can be destroyed with one command, which is also very cheap for a quick glance.
Vagrant
Vagrant can create local VMs according to specs in a declarative way. Check Vagrant Templates Intro for details
Vagrant will use VirtualBox as the default VM provider. however libvirt, docker, parallel desktop and vmware can also be used. We will use VirtualBox in this guide.
Installation
Make sure Vagrant and Virtualbox are installed and available on your OS.
If you are using macOS, You can use homebrew to install both of them with one command (reboot required). You can also use vagrant-libvirt on Linux.
Configuration
vagarnt/Vagranfile is a ruby script file describing VM nodes. Here are some default specs of Pigsty.
| Templates | Shortcut | Spec | Comment |
|---|---|---|---|
| meta.rb | v1 |
4C8G x 1 | Single Meta Node |
| full.rb | v4 |
2C4G + 1C2G x 3 | Full 4 Nodes Sandbox Demo |
| el7.rb | v7 |
2C4G + 1C2G x 3 | EL7 3-node Testing Env |
| el8.rb | v8 |
2C4G + 1C2G x 3 | EL8 3-node Testing Env |
| el9.rb | v9 |
2C4G + 1C2G x 3 | EL9 3-node Testing Env |
| build.rb | vb |
2C4G x 3 | 3-Node EL7,8,9 Building Environment |
| check.rb | vc |
2C4G x 30 | 30 Node EL7-EL9 PG 12-16 Env |
| minio.rb | vm |
2C4G x 3 + Disk | 3-Node MinIO/etcd Testing Env |
| prod.rb | vp |
45 nodes | Prod simulation with 45 Nodes |
Each spec file contains a Specs variable describe VM nodes. For example, the full.rb contains the 4-node sandbox specs.
You can switch specs with the vagrant/switch script, it will render the final Vagrantfile according to the spec.
Management
After describing the VM nodes with specs and generate the vagrant/Vagrantfile. you can create the VMs with vagrant up command.
Pigsty templates will use your ~/.ssh/id_rsa[.pub] as the default ssh key for vagrant provisioning.
Make sure you have a valid ssh key pair before you start, you can generate one by: ssh-keygen -t rsa -b 2048
There are some makefile shortcuts that wrap the vagrant commands, you can use them to manage the VMs.
Shortcuts
You can create VMs with the following shortcuts:
Terraform
Terraform is an open-source tool to practice ‘Infra as Code’. Describe the cloud resource you want and create them with one command.
Pigsty has terraform templates for AWS, Aliyun, and Tencent Cloud, you can use them to create VMs on the cloud for Pigsty Demo.
Terraform can be easily installed with homebrew, too: brew install terraform. You will have to create a cloud account to obtain AccessKey and AccessSecret credentials to proceed.
The terraform/ dir have two example templates: one for AWS, and one for Aliyun, you can adjust them to fit your need, or modify them if you are using a different cloud vendor.
Take Aliyun as example:
You have to perform terraform init before terraform apply:
After running apply and answering yes to the prompt, Terraform will create the VMs and configure the network for you.
The admin node ip address will be printed out at the end of the execution, you can ssh login and start pigsty installation.